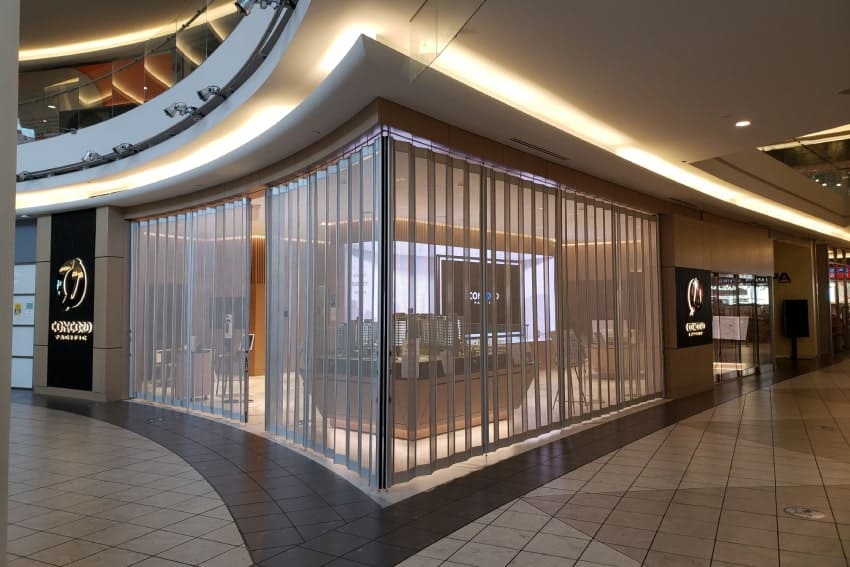
Our side folding security grilles are designed to be as easy to install as possible, but they’re still a working part of your store infrastructure, and installation needs to be done correctly. Whether you’re looking to install security gates in a mall, airport or security closures in a pharmacy, the installation steps need to be followed to the letter!
As one of our most popular types of security doors for businesses, we thought it would be helpful to showcase the installation process. This post is designed as part of a series that will supplement the step-by-step instruction guide that we give to our customers.
Table of Contents:
- Tools for Installing Side Folding Security Grilles
- Checking the Installation Site
- Installing the Track
- Hanging the Doors
- Guide to Post Types
- Mounting Wall Channel and Hookbolt Posts
- Installing BiPart Posts
- Installing Intermediate and Top and Bottom Posts
- Installing Trailing Posts
- Fixed Posts and Pull Straps
- Locking Plate Height Adjustments
- Adjusting the Curtain Height
Looking for side folding security grille experts? Contact us today!
1. Tools for Installing Side Folding Security Grilles
Here’s the list overview – we’ve included some notes below where understanding the details can help you avoid “gotchas” that some of our customers have run into. When in doubt, contact our highly experienced customer service department for guidance at 1-800-663-4599.
Tool Checklist
- 2 people (experienced in construction, ideally professional contractors)
- Safety equipment
- Ladder or work platform
- Dolly (if required for heavy doors)
- Miter saw with non-ferrous blade
- Steel saw (only if installing a grille in an aisle).
- Cordless drill
- Hammer drill
- Concrete drill bits (1/4”, 3/16”, 3/4”)
- Standard drill bits (1/8”, 316”, 1/2”)
- Driver bits
- #2 square (Robertson) x 3” long
- #2 Phillips (star)
- 5/16” hex
- Screwdrivers
- 1/4” flat
- 1/8” flat
- #2 square (Robertson)
- #2 Phillips (star)
- (2) 7/16” combination wrenches or drivers and sockets
- 8 oz. hammer
- Rubber mallet
- Metal file
- 4”squeeze clamps
- Pencil
- Measuring tape (Imperial, not Metric)
- Chalk line
- Level (4’)
- Gloves
- Utility knife
- Mild all-purpose cleaner
- Rags
Tips For Side Folding Tools and Materials
1. A Non-Ferrous Saw Blade is Essential
The most common pitfall customers run into is accidentally using a ferrous saw blade to cut the track, as these are a common part of most tool kits. Ferrous blades will melt the aluminum track or otherwise leave bad edges.
We specifically require a non-ferrous saw blade to ensure that the cuts are clean and square – or else you’ll run into problems at the joints.
2. Screws and Drill Bits
Dynamic Closures supplies all screws needed for typical installations in wood or sheet metal. If your header is made of another material you will need to source the proper fasteners. For example, if you’re attaching directly into concrete you’ll need concrete screws, and I-beams will require nuts and bolts of the correct size.
Please note that mounting the track to the header requires square-head screws for extra grip (our Canadian customers know these as Robertsons). If you’re new to square screws we’re sure you’ll come to love them in short order, as they almost never strip.
It’s also important to make sure you have the right length driver bits because you’ll need to be able to reach into the track.
3. Chalk Line
We recommend using a chalk line instead of a laser level for marking the path of the track on the header. Laser levels can be used, but we find that a chalk line, when marked properly, is infallible.
4. No Track Lubricant Needed
You read that correctly – please don’t add any lubricant to the track. The plastic wheels glide nicely along the aluminum rails just the way they are.
Many years ago, we did use lubricants but we found they accumulated dust and grit that interfered with door performance and could cause long term damage. All you’ll need to do when installing is ensure any debris inside the track is wiped away.
5. Changing Locks
Sometimes door locks need to be either rekeyed or changed entirely to conform to the master. While a locksmith will normally do this for you, if you are doing this yourself you’ll need additional tools, especially a 3/32 allen key.
6. Loading In
Before you do any lifting, it’s important to plan your load in, especially when installing in multi-floor facilities. Even standard-height doors can weigh hundreds of pounds and will not fit in most elevators. Coordinate with the maintenance and security teams for your facility as needed to ensure a smooth load in.
7. Lifting
While we package individual door sections in separate boxes to keep the weight manageable, please ensure you know and use proper lifting technique when carrying and repositioning the doors. In particular, you will need to be able to align the door vertically and lift it a few inches further to pop it into the track. We note the weight on each box.
Aside from a dolly, for standard doors you should not need any specialized lifting equipment, although exceptions do occur for some of our larger custom doors like this one. In almost all cases you’ll need 2 people to lift and manage the boxes.
8. Safety Equipment
Installing a security grille involves overhead work, so hard hats are required. Eye protection is also a must, especially when cutting metal track. If you’re a professional contractor, you should be familiar with the complete safety gear list needed for a commercial site.
2. Checking the Installation Site
This is an essential step that can save you time and headaches. While Dynamic Closures guarantees our doors match what you ordered, we can’t guarantee that your build site hasn’t changed since the order was made.
Every door comes with a PDF copy of the installation instructions, which outline the essential steps. The information below adds some helpful notes.
Checking Your Delivery
The first step is to ensure that all your boxes have arrived, and that they’re in good condition. We ship our doors in boxes that are numbered in installation order. Depending on the size of your door, there can be up to 20 boxes. Check your packing slip and make sure that they’ve all arrived.
Also make sure your boxes are undamaged. We’ve had clients report everything from crushed boxes to holes in the boxes from forklifts that have gone right through them, and of course a damaged box can mean potential damage to the door inside. If a box is missing or damaged, call our customer service number at 1-800-663-4599.
If all of your boxes have arrived in good condition, put them aside. We recommend a thorough check of the site before opening the boxes.
Checking the Installation Site
1. Measure the Opening
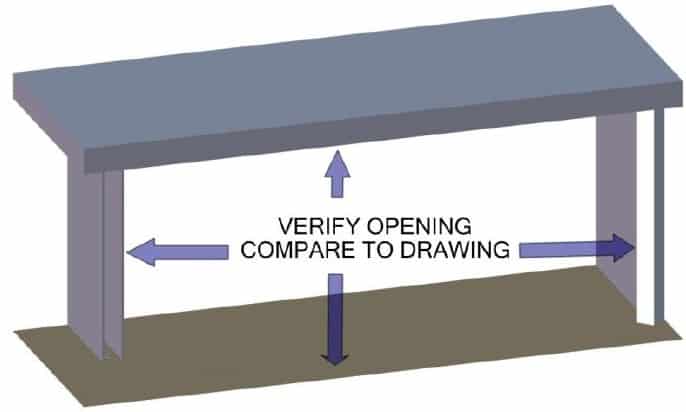
Your delivery should be accompanied by the original layout drawing that was provided to us when we designed the door. Check that the overall height and width of the actual opening match the drawing.
Tolerances
Overall opening width tolerances are generous, about 3”. This is because the individual panels in your door are 4”, 7”, or 11” wide, and the overall door has some give to it when closed. If your opening is more than 3” wider than what was specified in the drawing, call our Customer Service department.
Height tolerance is about 1 ¼”, as there needs to be a slight gap under the door. If the difference in the actual opening is more than that the gap will be too large. It will not only look foolish but the locking bolt won’t reach the floor socket.
If your door is going above a counter, the height tolerance is about ¾”.
2. Check the Header
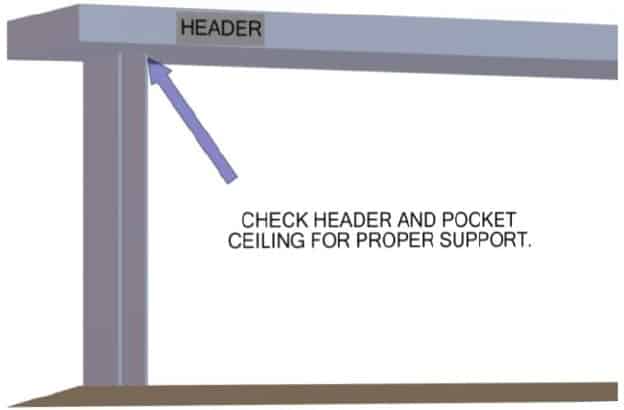
The header needs to be able to support the weight of the track and the door, and should be made of wood, steel, or a similar material (see our PDF for more information). The site plan should include the header, and you can check with the construction supervisor to confirm that the header was installed and is made of a continuous material.
The area above the pocket also needs to be verified.
3. Ensure the Floor is Level
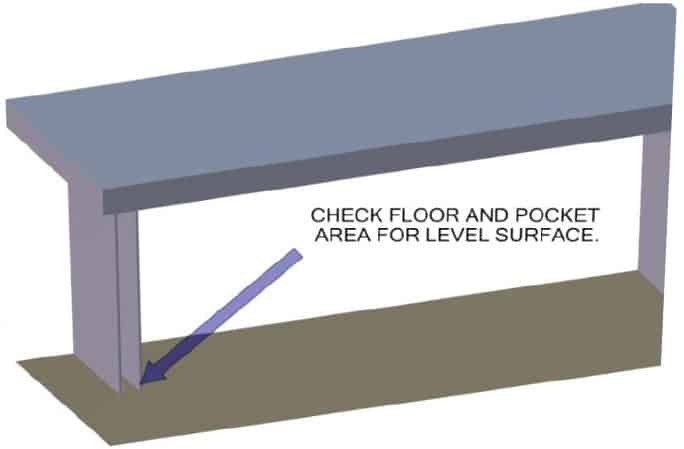
Check the entire opening including the pocket area to ensure it is level. Tolerance is 1 ¼” for the entire opening. We know concrete work can vary in quality, and it’s why we allow for a gap underneath all our doors when we build them.
Countertops are usually installed very level, so it should be well within the ¾” tolerance.
4. Check the Pocket for Debris and Protrusions
The pocket will contain the full door stack when the door is open, so it needs to be clear. Sometimes construction debris is thrown into the pocket. We’ve also heard of cases where handrails were installed on the public side of the pocket, and long screws jutted into the pocket opening. As you can imagine, the damage to the door was considerable.
3. Installing the Track
This step is meant to accompany your installation instructions, which will be a lot like these. We’ll review the steps and go into more detail, and explain how to avoid some common pitfalls.
Clearances

But first, a note about clearances for the path of the track. It’s critical that you observe the minimum clearances listed, especially in the pocket and around curves.
Minimum clearances (shown as ‘A’ in the diagram above) are:
- For Slim Line 4 Inch doors: 2 ½”
- For Standard 7 Inch doors: 4”
If you don’t observe the minimum clearance in the pocket, you risk damage to the door if users try to jam them in. If possible, try to provide a bit of additional clearance beyond the minimum, as it improves usability.
Your security grille is basically a giant metal curtain, secured from the top and free on the bottom (until locked). When users open and close the door, it tends to swing out at the bottom, especially around curves. Having that extra bit of room makes for a more convenient experience for the person who opens and closes the door every day.
Final Preparation Steps
1. File Track Edges Smooth

It’s important to ensure any cut edges on the tracks are filed as smooth as possible and there are no metal filings/burring remaining. You’ll need each section to fit flush to its neighbour.
This is essential to ensure the door doesn’t catch, and flows smoothly from section to section. Neglecting to do this one of the only issues our customers ever have with track installation, and it not only makes for a “bumpy ride” but it can mean your door doesn’t last its full lifespan.
2. Confirm Track Hole Size
The track comes with holes sized for the #10 x 2” screws we provide for typical installations in wood and steel headers. If your header is masonry, however, you may want to use the appropriate fasteners for your material.
We recommend keeping to a #10 x 2” screw size even if you need to change screw type. If you need to increase the mounting hole size in the track, however, you can use a drill. There should be no need to file the hole.
3. Mark Track Centreline Path
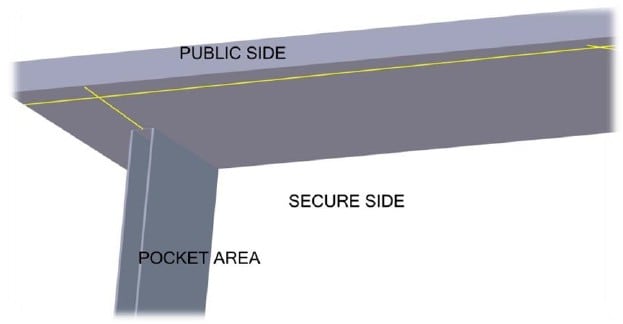
Snap chalk lines to mark the centre of your track as per the your specific installation drawing (provided with your delivery). Mark where the path emerges from each pocket and how it travels across the opening.
Installation
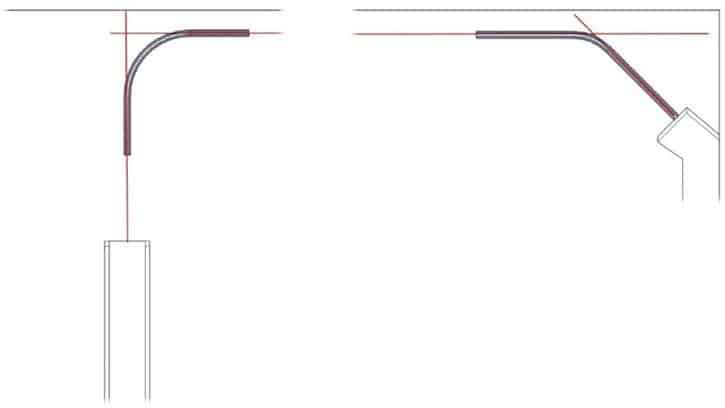
1. Install Curved Track Sections First
Install any curved sections to ensure the layout works. After, you’ll be fitting the straight sections between them, starting with the pockets and working your way out.
Don’t forget to leave one section uninstalled so you can load the door into the track. It can be any section along the centre of the opening, as long as it’s long enough to hold the entire door. We find, however, that it’s easiest if you leave the section furthest from the pocket uninstalled.
2. Join Straight Sections of Track One By One
Straight sections of track come in 4’ and 8’ lengths, and where possible we provide longer lengths to reduce the number of joins.
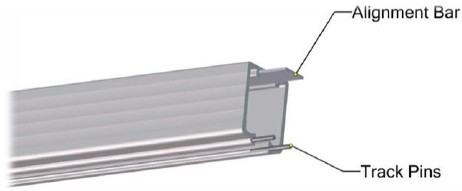
Each section of track has an alignment bar at the top and two pins at the bottom. These should be used to marry each new section of track to its previously installed neighbour. If needed, the pins can be moved from one end of the track section to the other. We also include extras with every door, just in case.
To join each section, first line up the track:
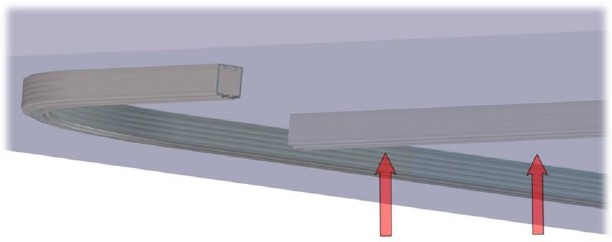
Then join the track, ensuring the bar and pins on the new section fit the previously mounted section.
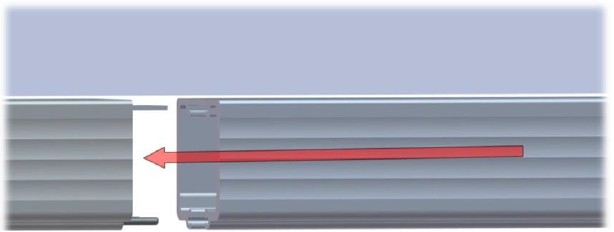
The joint should be as square and flush as possible, or else the wheels on the door won’t flow smoothly.
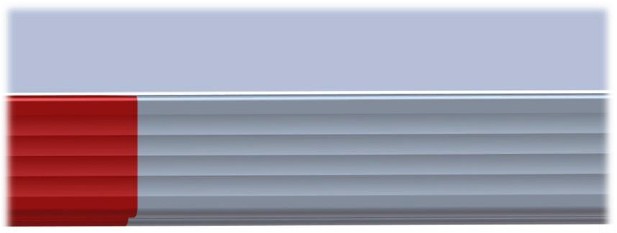
Once you’ve confirmed there are no gaps, screw the track section to the header using all of the pre-drilled holes.
4. Hanging the Doors
At this stage, you have all your tools handy, you’ve checked the site and you’ve installed the track, leaving one section open so you can lift the door into the track. Now you’re ready to hang the doors.
Get Familiar With Door Posts and Curtain Sections
In your documents package, you will have an outline of how the posts and sections should be installed, referencing the public side of the door and the area secured by the door. Locking posts are specially labelled.
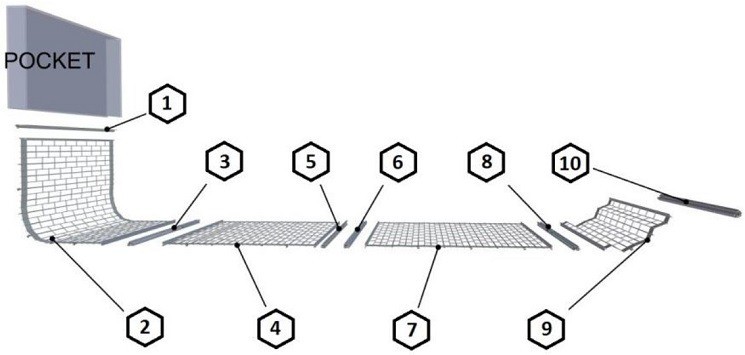
Each post and door section delivered to you is labelled with its own number that will match the layout drawing.
Loading the First Post
With the help of the drawing, find the post that is furthest away from the break in the track. You may recall that in the track installation post, we recommended leaving the track section furthest from the pocket uninstalled. This will make finding the furthest post as well as the overall curtain load-in simpler.
When you’ve found the furthest post, ensure it is oriented correctly by checking the sticker. The sticker may look like one of these:
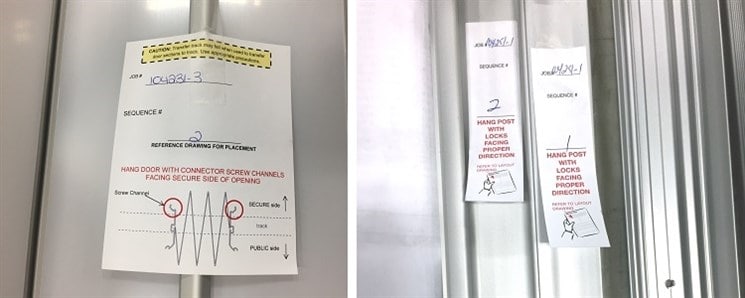
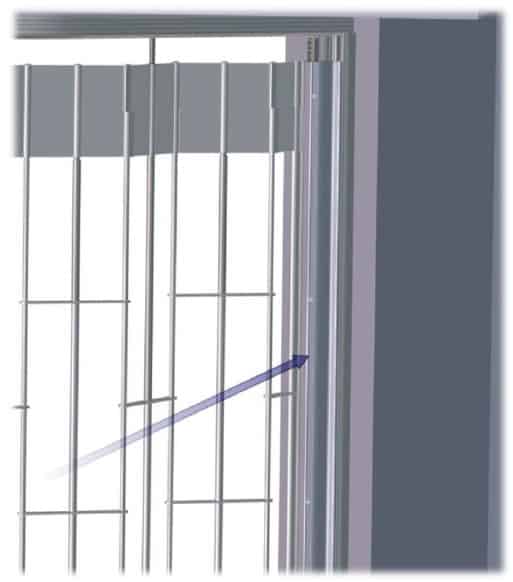
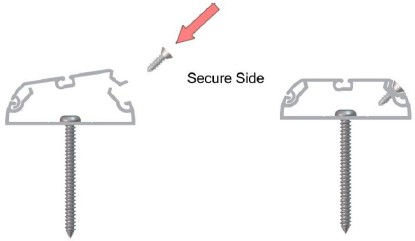
If your door is designed with locks only on one side, it’s important to ensure the locks are facing the public side. If your door is lockable from both sides, then you’ll want to check for the screw channels. Screw channels are always on the secure side.
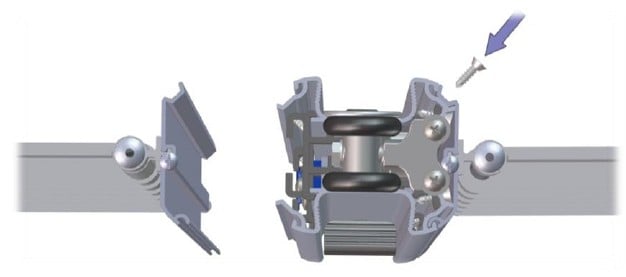
The blue arrow shows how to find the screw channel on a post.
Once you’re sure of the orientation, one person can lift the post into the track.
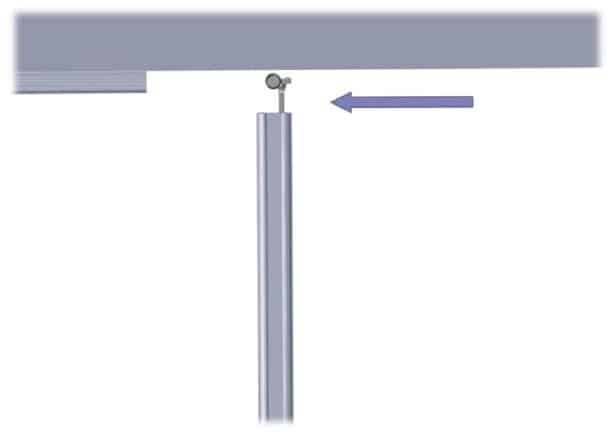
Use the Transfer Track to Load the First Curtain Section
You will need two people for this step. Experienced installers may be able to load the curtain directly into the installed track on the ceiling. For easier loading, however, we recommend feeding the curtain into a separate, disposable section of track that we provide, called the transfer track.
Loading the Curtain onto the Transfer Track
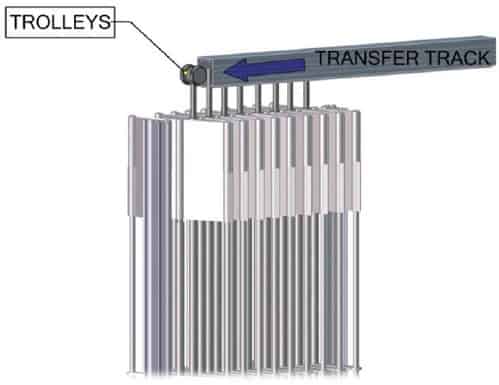
To begin, make sure you have the curtain oriented correctly. You can tell the secure side because we mark it with a sticker.
Once you know which side you want facing out, load the curtain into the transfer track, ensuring that none of the trolleys haven’t become twisted sideways in the track.
Lifting the Curtain into the Track Installed on the Ceiling
Place a properly sized block of wood under the installed ceiling track. You can stand the curtain on this (once it’s vertical) to help hold it in position while you’re feeding the curtain from the transfer track to the track on the ceiling.
For counter height curtains the block will be about ¾” high or less. For a full-height door it will be 1” – 1 ½ “ depending on your exact site. Have some shims handy for the best fit.
It’s best for two people to be involved in the lifting and feeding operation. One person raises the curtain to the vertical position from the ground and helps keep the curtain stable, while the other person is on a ladder helping to lift and making sure the transfer track doesn’t roll off.
Once the curtain is vertical, place the transfer track end to end with the installed track on the ceiling, ensure it is closely aligned.
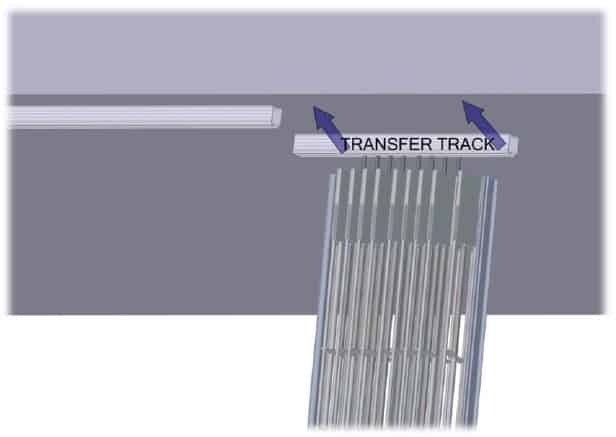
Slide the curtain section into the ceiling track. Be careful – the tendency is for the transfer track to fall once the curtain has been rolled over to the ceiling track. As this can damage floors, ensure the person on the ladder is ready to catch it.

Repeat with the next post and the next curtain section, and all following, until all the sections are in the ceiling track. Double check that everything is facing the right way, and then install the final section of the track.
Attaching Posts to Curtain Sections
At this point you will have separate posts and curtain sections suspended from the ceiling track. In this step you will attach them all together so they are one continuous unit.
To connect a section of curtain to a post, first bring them close together.

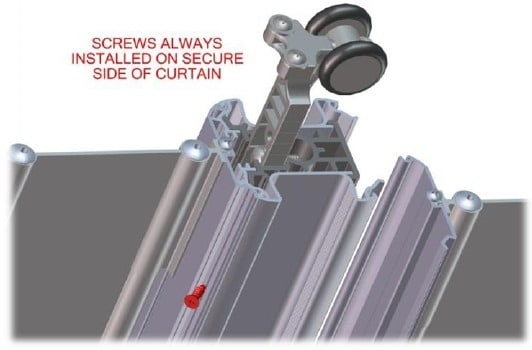
On the curtain, one side will have a hook. Insert it into the slot on the post, and rotate it until the curtain is flat against the post.

Here is close up of that connection:

Once the connector is flush, you’ll reinforce the connection by adding screws into the screw channel spaced 18” apart. We have supplied all of the #6 self-drilling screws you’ll need, but we often include some extras just in case, so don’t worry if you have some left over.
Again, it’s critical that the screw channel is on the secured side of the curtain.
5. Guide to Post Types
Now that you’ve got the posts and curtain mounted in the door track, it’s time to attach the posts to the floor and/or wall.
From here the installation instructions diverge, as the installation method will depend on the type of post.
In order to use the correct installation method, you will need to compare each post to the diagrams below to determine what type it is. Here is a guide to the symbols we use in our descriptions for the different kinds of posts:

Here is what they look like from the side:
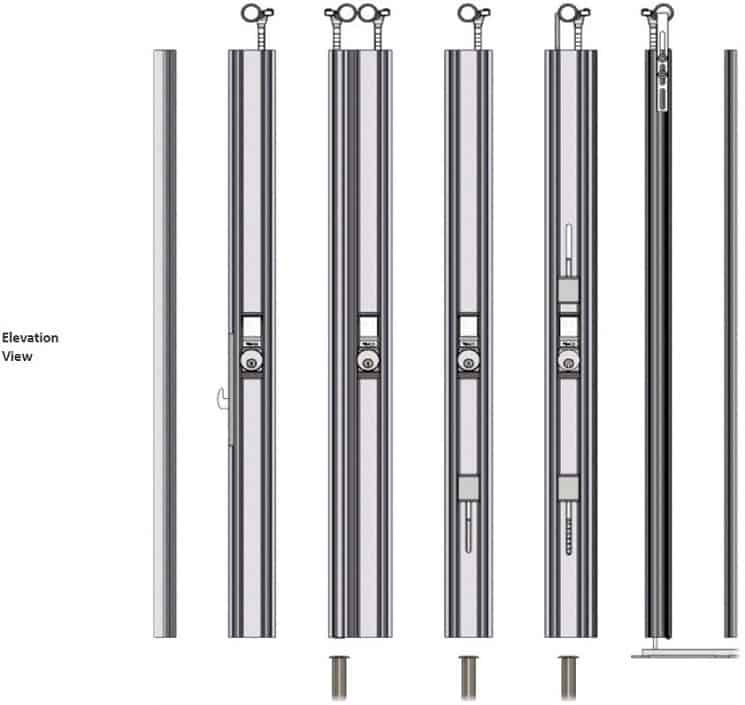
Descriptions of the Different Types of Posts
These post types will be determined in the planning and design phase of door construction to meet the specific logistical and security needs of the facility.
Type 1: Wall Channel
A wall channel is, as the name suggests, always secured to a wall. It is a full-height aluminum channel that provides a receiving end for a hookbolt from a Hookbolt post.
Type 2: Hookbolt
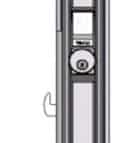 Hookbolt posts are named for the hookbolt lock they have. Because they secure to a wall channel, they don’t need a floor socket. Your Hookbolt post may potentially have a double hookbolt and/or an additional spring-loaded top lock, depending on design requirements. Additional top locks are helpful when the posts are over 14’ tall, as they add extra stability when the door is closed.
A hookbolt is one of the two options for a leading edge for a door.
Type 3: Bipart
A bipart post is a pair of posts that come together to seal the secured area. These are used when there is a need to separate the door into more manageable sections, or to split the door so they stack in two different wall pockets. For every 30 feet, side folding doors should have at least one bipart post.
They lock using a hookbolt, and have an added lock rod to keep the curtain in place. The lock rod is concealed from the public side of the door, and fits into a floor or counter socket. Double hookbolt and top locking is standard on doors over 14 feet in height but optional on shorter doors.
If there is an emergency egress door built into the security grille, it is usually between bipart doors so they can be easily found. The emergency exits can be either single door (as shown below) or two-door swing out as shown here.
Type 5: Intermediate
Intermediate posts help keep the curtain structure looking crisp and uniform, and prevent people from getting under the security grilles. They are located approximately every 10 feet along straight sections of the door, but closer together on sweeping curves. For standard curves, they should be placed near the centre.
On curtains that secure the area above a counter, there should be intermediate posts no more than 6’ apart.
To keep the post in place, they are locked using either a spring-loaded lock rod that sinks into a floor socket. A simple cylinder or thumbturn provides easy unlocking.
Type 7: Top & Bottom
A top and bottom post is another option for the end of a door. Optional leading edge treatments include a rubber bumper, flange, or blank face. Rubber bumpers protect drywall from damage from the metal posts, and flanges prevent people from reaching around the post into the secured area.
Spring-loaded lock rods insert into a floor socket and the ceiling-mounted track. They can be unlocked with a keyed cylinder or thumbturn.
Type 9: Trailing
A trailing post is designed to be the final post in a door on the end that fits in the storage pocket. This end can travel freely, but only within the wall pocket – as the post self-locks into the permanent header and floor stops. When closed, a rear flange fills the opening on the sides of the posts to prevent anyone from reaching through the end of the door.
This type of post is secured inside the pocket, so no lock is needed.
Type 10: Fixed
A fixed post attaches a door permanently to a wall or other structure. No lock is needed for this type of post.
Helpful Hints
These tips will help you install your posts so that the curtain ends up looking crisp and professional, instead of saggy or billowing.
- It is essential to ensure Wall Channel posts are plumb and level. If not, the whole security curtain will need to pivot for the lock to fit. This not only looks sloppy but potentially created gaps at the floor level through which people could enter the secured area.
- Only install Bipart posts after Wall Channel Hookbolt posts, Top and Bottom Post, and Fixed End Post. Bipart posts are in the central sections of the security door, and require floor sockets to be drilled, so you want to eliminate any chance of these being in the wrong place.
- After the Bipart, install the intermediates
- Always install Trailing posts last, as there is a bit of latitude on placement and they can be used to take up any remaining slack.
6. Mounting Wall Channel and Hookbolt Posts
At this point in the installation process, you have already gone through a number of steps to get the track mounted and the curtain installed in the track.
Wall Channel and Hookbolt posts always go together, so we will cover them both in this post. As you may recall from our post guide, Wall Channels provide a space for a the lock in the Hookbolt posts to engage.

Diagram of a Hookbolt post (top) and a Wall Channel post (bottom).
Quick Notes
- Hookbolt posts can have either 1 lock or two, and depending on height may have an additional top lock. These can help stabilize taller doors.
- Neither of these posts has a floor socket to drill.
- The posts are tall but light, so it’s possible for one person to take care of Wall Channel installation.
Step 1: Check the Fit of the Wall Channel Post
Wall Channel posts are not mounted into the track with the curtain and other posts: it’s unconnected to the overall security door until you mount it to the wall. So the first thing you need to do is ensure it fits.
The Wall Channel post we deliver will match the opening specifications, but we find the real-world opening on the construction site may be too small. If this is the case, you may want to trim the wall channel to fit exactly.
To do this, measure the distance from the floor to the underside of track, and compare to the height of the Wall Channel post. If it looks like you need to trim the post, do this from the bottom, and be sure your measurements and markings are precise. Ideally, when you’re done, the post will be an exact fit so there are no visible gaps above or below the post.
A note about saw blades: if you need to trim the post, use a non-ferrous blade on your mitre saw. Standard ferrous blades will leave rough and melted edges.
If you find that you’ve trimmed too much, don’t worry, you don’t have to order a new post. You can adjust the height of the lock plate to a certain extent. If needed you can also adjust of the height of the post on the wall, but this will create a gap above the floor or below the track.
Step 2: Mount the Wall Channel Post to the Wall
Find Plumb
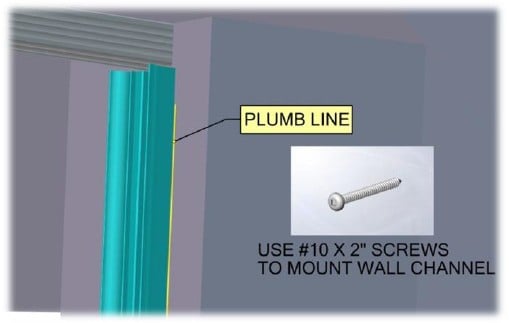
Center the wall channel directly under the track. Using your 4’ level, ensure that the wall channel is plumb. It can be helpful to mark a line.
It is essential that you’re precise at this stage: if the wall channel is not level, the entire security grille will bend out or in when the door is closed. This looks sloppy and make it awkward for user when locking the unit.
Screw into Place
Mount the wall channel in the pre-drilled holes using #10 x 2” screws provided.
Step 3: Check that the Lock Engages
Hookbolt posts don’t need a floor socket, so all you need to do is check the that the lock will close smoothly.
Close the Hookbolt post into the Wall Channel and turn the key to make sure the hook bolt engages the lock plate.
The lock plate position can be adjusted to ensure a perfect fit. We’ll be covering how to adjust the lock height and more in a future article, and a quick guide is included in the PDF instruction booklet.
7. Installing BiPart Posts
gives instructions and tips for installing Bipart posts for your security grille. You should have already mounted the track to the ceiling and loaded all curtain sections and posts into the track.
Like the Wall Channel and Hookbolt posts, Bipart posts are actually a set of two posts (see the diagram below). The male Bipart post is essentially a Hookbolt post, and the female post is much like a Wall Channel.
Now that they’re in the track all that’s left to do is install the floor socket and ensure they lock correctly.
Important: only install bipart posts after all other post types have been secured to the wall or floor as needed.
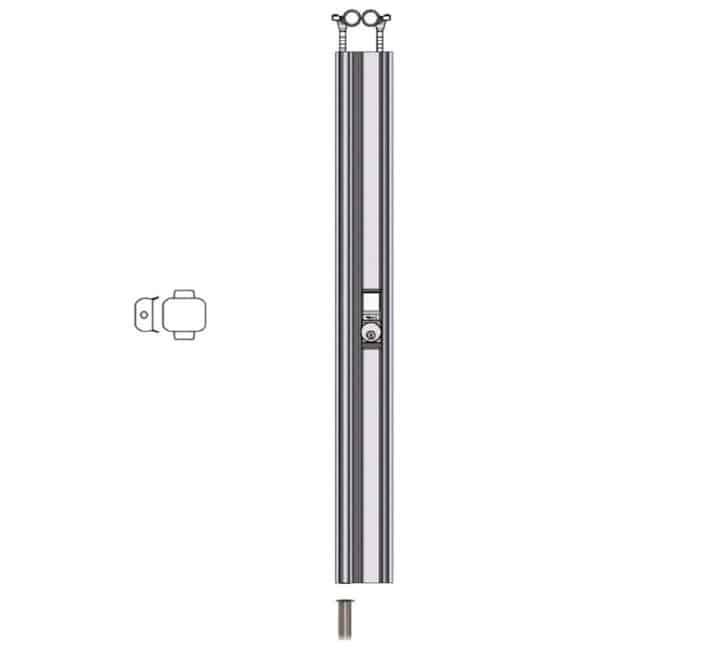
Diagram of a Bipart post, showing simplified top view on the left and side view on the right.
Step 1: Position and Lock Bipart Posts
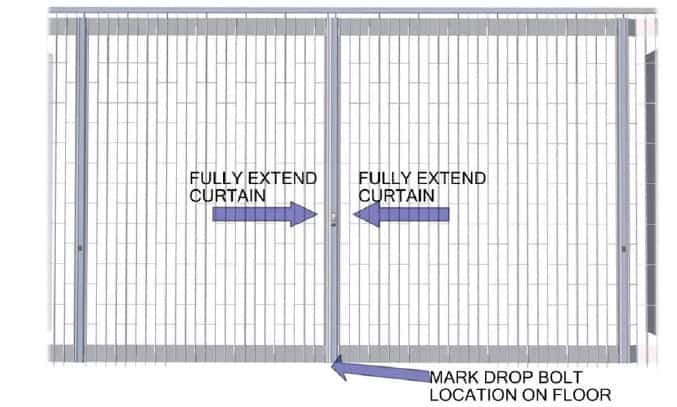
Lock any other post types in your door and ensure they’re in the correct location. Ensure end posts are also locked.
Then, fully extend both sides of the Bipart door, and ensure they meet in the desired location. This is often in the centre of the door, but not always. Your custom drawing included with the door should give you exact measurements.
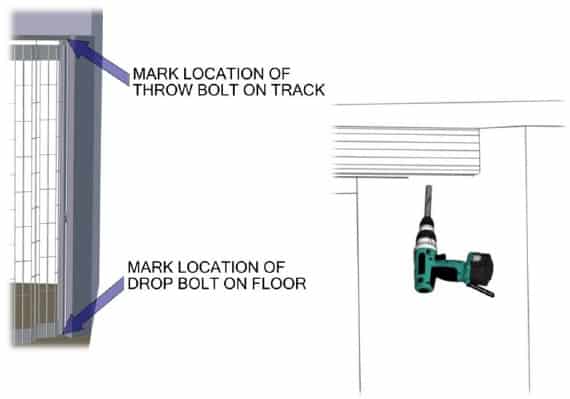
Step 2: Mark the Location of the Drop Rod
Once you’re sure that the Bipart doors meet in the correct location, find the female post (receives the lock, contains the drop bolt). You won’t be able to lower the drop rod while the two halves of the Bipart door are together (this is a security feature to prevent tampering), so mark the approximate location of the drop rod on the floor.
To double check that you have the correct location, unlock the Bipart and move the male post away. Lower the drop rod to the floor and mark the location of the drop bolt on the floor. You can either mark the centre or trace around the drop rod, whichever you’re used to.
Be Sure Your Hole Location is Correct
It’s important to take the time to ensure you’ll be drilling in the right location. While there is about ?” play, filling in an incorrectly positioned hole in a floor is difficult – in a granite countertop it’s effectively impossible without leaving an unsightly plug.
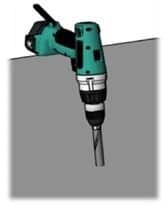
Step 3: Drill the Hole for the Floor Socket
Depending on whether you’re drilling a hole in the floor or on a countertop, you’ll be drilling the hole at two different depths:
- For floor socket: drill 3/4” diameter x 2-3/4” minimum deep
- For countertop trim ring: 5/8” diameter x 1” deep minimum – but it should go all the way through the counter if any food preparation is going on in the secured area.
A Note About the Two Types of Sockets
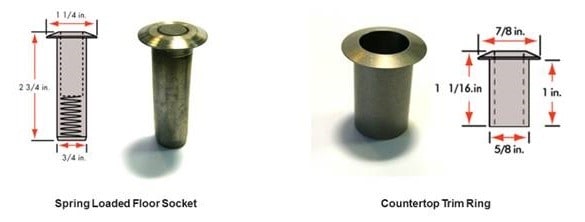 Countertop trim rings have an open bottom to allow debris to pass through the socket and into a collection bin below the counter. This is prevents health issues in food preparation situations, because if staff are wiping the countertops and crumbs fall in.
Floor sockets have a spring-loaded cap that prevents the entry of most dust and debris. When the drop rod is lowered it simply pushes the cap down.
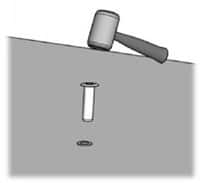
Step 4: Insert the Socket into the Hole
You should be able to push the socket into the hole – use a rubber mallet if needed.
When using the mallet, tap straight down. Striking it at an angle or with too much force can damage the socket, so if it won’t go in ensure the diameter of the hole is correct. If needed, we can provide replacement sockets.
8. Installing Intermediate and Top and Bottom Posts
If you’ve followed all of the steps so far, you’ve got the track installed in your ceiling and have hung the curtain. You’ve also installed some of the post types already, depending on the type.
In this article, we’re going to show you how to install Intermediate and Top and Bottom Posts.
Intermediate Posts
Intermediate posts provide structural support to a security grille. They prevent intruders from lifting the curtain and gaining entry to the secured area, and they also help keep the overall look of the security grille looking crisp and even.
While all post types in your installation kit are clearly numbered and indicated in the installation diagram, here’s what intermediate post types look like for reference:
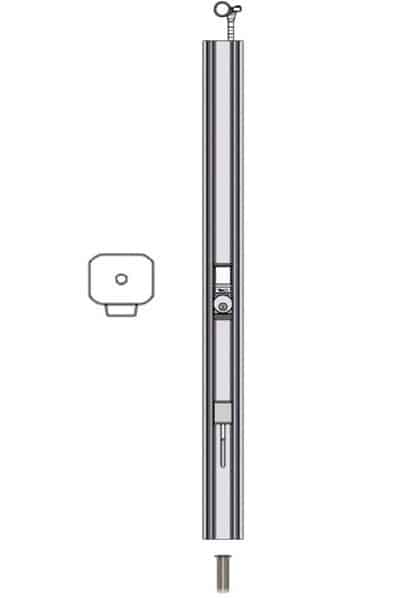
This diagram shows what Intermediate posts look like – a simplified view on the left and an elevation diagram on the right.
Step 1: Set Up all Other Posts
The general idea is that make sure everything is positioned correctly before you drill any holes, as these can be catastrophic, especially if you’re installing above a granite countertop.
Roll out the entire security grille and lock any previously installed posts in place. Allow the entire curtain to hang naturally – there should be fairly even tension throughout the curtain, and no visible slack.
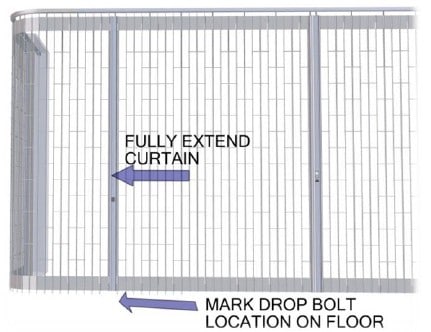
A Note About Slack in Doors
While we do our best to create doors that are as close to the opening width as possible, we’re limited by panel width. Each panel is 6” wide, so sometimes there’s a small amount of overage in order to ensure the door meets both ends of the opening.
Bipart Posts
If your door has a Bipart post, which can only be installed after all other post types, ensure they’re locked and in position. Then install the Intermediate posts closest to where Bipart posts meet and work your way out, post by post, towards each wall or pocket. This will move any slack towards the walls, and help the overall security grille look as even and taut as possible.
Trailing Posts
If your door includes a trailing post, again, ensure that any slack in the door goes towards the end.
Usability
It’s important not to stretch the curtain too tight. If you do, the end user of the door will have to struggle to position the bolt for locking, and it will be difficult to open too. If the door is so tight that the bolt is slanted in the socket, it’s possible that damage to your door may occur.
Steps 2 and 3: Drill Hole and Install Floor Socket
You can get the full details on how to mark the location of the drop rod, drill the hole, and install the floor socket here.
Top and Bottom Posts
Top and Bottom posts are one of the options for securing the security grille to a wall. Because they don’t require the installation of a Wall Channel post, they’re a great way to preserve the clean look of the secured area. Top and Bottom posts can be fitted with soft ends like rubber bumpers to ensure that walls don’t get damaged.
Top and Bottom posts are so called because they have locks at the top and bottom of the post, whereas all other post types have bolts only at the bottom.
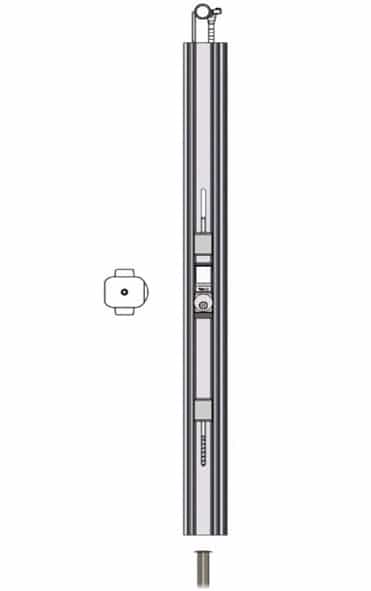
This diagram shows what Intermediate posts look like – a simplified view on the left and an elevation diagram on the right.
Step 1: Position the Post
Place the post in its final position, and verify that it is hanging plumb. You may want to have someone hold it in place. If you don’t have someone else to help, you can alternately lock just the top or bottom to hold the post in place. This will leave the opposite end slightly free so you can mark the correct position.
Step 2: Marking the Top Hole
The lock at the top of the post doesn’t require a socket; you’ll just be drilling through the track up into your ceiling header. We supply tracks that have stickers showing where holes are located:
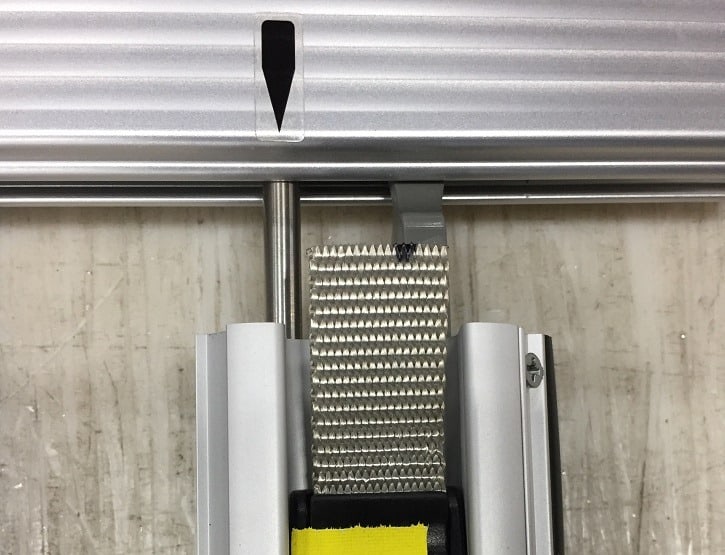
Mark the location of the top bolt on the track. Drill a ½” diameter hole through the track.
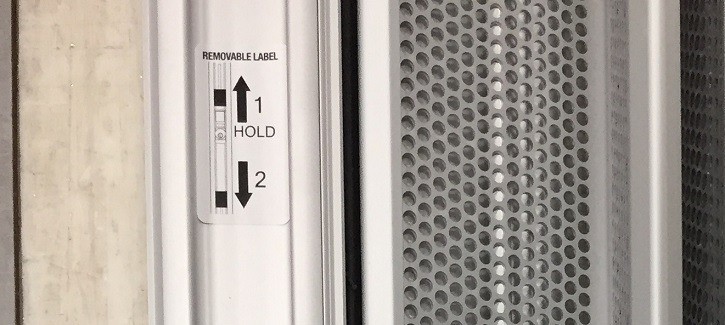
Tip: To make it easier for the end user to find the location of the hole, mark where it is on the track. Because of the way the lock works, end users will need to lock the top lock first and then the bottom – a sticker on the post explains.
Steps 3 and 4: Drill Hole and Install Floor Socket
You can get the full details on how to mark the location of the drop rod, drill the hole, and install the floor socket here.
9. Installing Trailing Posts
In this part, we’re exploring the details of security door installation. The idea is to go beyond the basic instruction manual PDF and provide some extra tips that will help you ensure your Dynamic Closures security grille operates as smoothly as possible.
What Is a Trailing Post?
A trailing post secures the end of the security grille curtain within a wall pocket.
It has a bit of room to move within the storage pocket, but never leaves it, and so does not need a lock. It prevents intruders from entering the secured area by containing the end of the curtain, and also reinforces the smooth appearance of the grille.
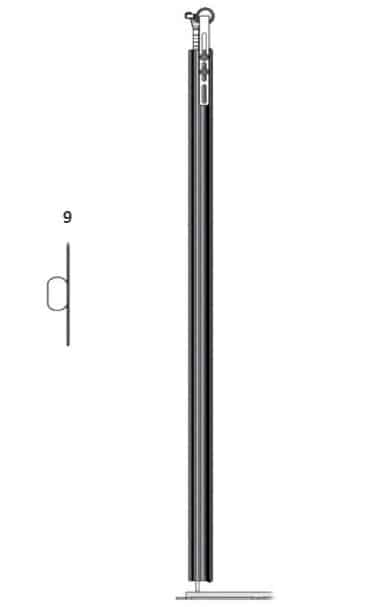
In the diagram above, you can see a trailing post simplified top view on the left, and side view on the right.
A Trailing post is always the absolutely last one to be installed, so it can act as a tension adjustment.
Prepare to Install
Get started by fully extending the curtain and locking all the other posts in place.
You should get a feel for the right amount of tension in the curtain. You don’t want it to look loose and sloppy, but don’t make it too tight either, because your users will find it hard to lock, and may inadvertently damage the door while trying.
Be careful at this point, because it’s one of the most important steps in the overall process: if you get this wrong, you’ll be drilling your holes in the wrong spot.
Marking and Drilling the Floor Hole for the V-Stop
The V-stop defines the area of play for the Trailing post within the pocket. It has raised edges that taper towards the front, to catch the post wherever it is in the pocket and ensure it always comes to the correct spot when it is pulled forward.
Now that your door is in final position, you’re ready to mark the holes for the V-stop.
- Put the V-stop within the pocket, flush with the front connector face of the trailing post, then mark the front mounting hole on the floor. We find china markers or soft pencils work best.
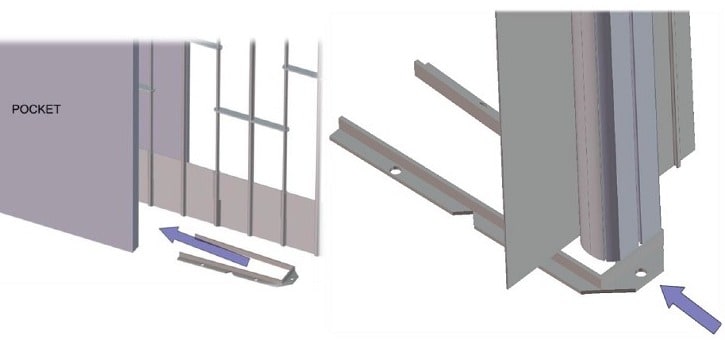
2. Remove the V-stop, and pull the door back out of the pocket area entirely.3. Next, you’ll need to bend the arms of the V-stop wider or narrower so they perfectly fit both walls of the pocket. This is to ensure that the post can’t escape the stop:
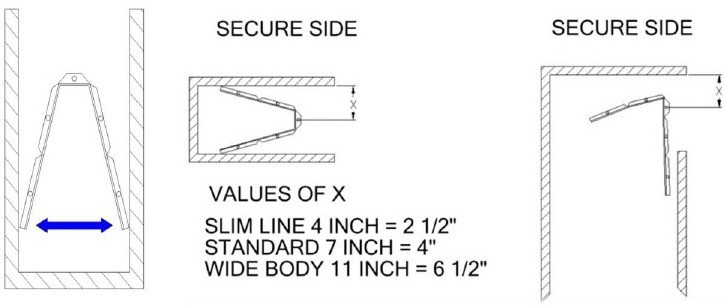 4. Replace the V-stop in the pocket to ensure a perfect fit. Then, line up the front edge hole with your mark, and then mark the other 4 holes on the arms.
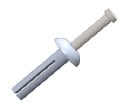 5. Now you’re ready to drill the holes to secure your V-stop to the floor. Use your drill to make each 1/4” hole, 1 1/4” deep where you made your marks in the pocket. Tap the sockets into the holes.6. Replace the V-stop and fasten it to the floor using the nail-in anchors provided. Start with the hole in the front edge, and proceed to the rest.
Mounting the Post in the Pocket
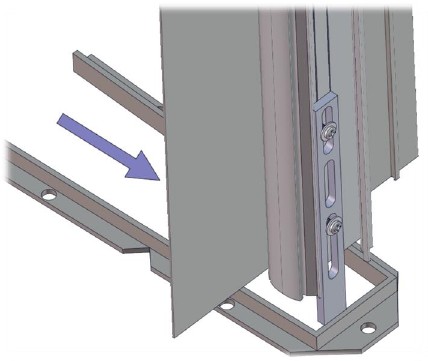
Now you have your V-stop stop in place, but you still need to put the post back and position both floor and ceiling stops. These are two flat bars with vertical adjustments.
To get ready, detach the Trailing post from the curtain, and raise the bottom stop enough to pass over the V-stop. It should now be behind the V-stop.
Secure the Post to the Floor
- Loosen the retaining screws and lower the bottom stop until it is just off the floor. Check that the stop clears the floor though the entire pocket are. Adjust if necessary – ensure it won’t scrape the floor at any point in the pocket, but also that it can’t float over the V-Stop.
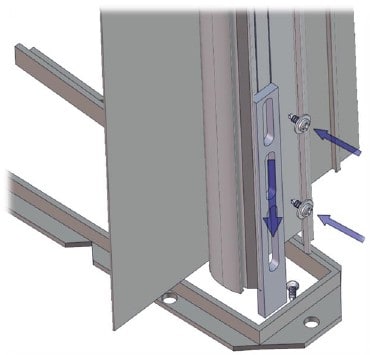 2. Move trailing post until the bottom stop is up against the front of the V-stop.
Secure to the Ceiling Track
Check that the post is hanging plumb, and that the floor stop is resting securely against the V-stop.
The U-stop is supplied – it’s a u-shaped piece of metal – along with appropriate screws:
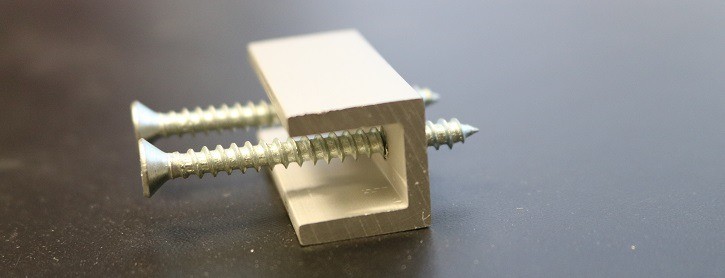
As with the V-stop you mounted on the floor, all it does is create a physical barrier at the appropriate point in the ceiling track.
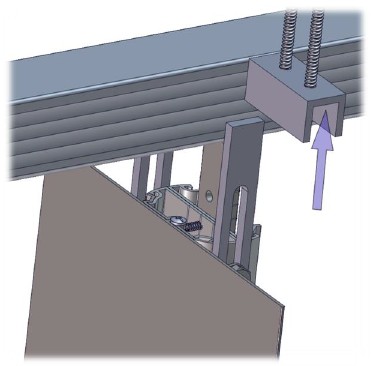
1. Just in front of the ceiling stop in the post, drill up into the U-stop through the header track with the #10 x 2” screws:
2. Loosen the hex bolts to adjust the height of the top stop:
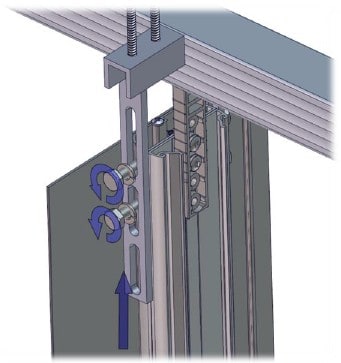
3. Raise the top stop so that it catches to U-stop on the ceiling. Check the height so that it doesn’t scrape the ceiling, but that it can’t help but catch on the U-stop. As a rule of thumb, leave as little clearance as possible between the top stop and the ceiling:
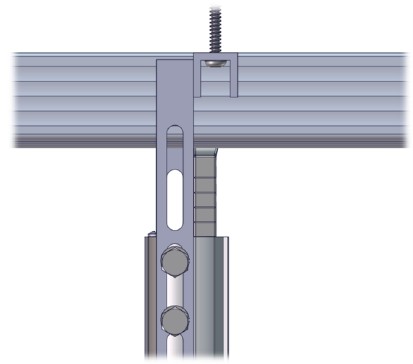
4. You final step is to re-attach trailing post to your security grille curtain.
10. Fixed Posts and Pull Straps

Dynamic Closures security grilles are easy to install, but if you’ve never done it before there are some steps you will want to follow so that your door works as smoothly as possible for all users.
We include the basic PDF instructions with every installation kit, but in this series of blog posts we explore a few more details and help you avoid some pitfalls you can run into if you’ve never installed a security door before.
What Is a Fixed Post?
Fixed posts don’t move – they simply attach directly to a wall or other structure. They have no locks and don’t sit in pockets. Their purpose is to provide support for the grille and security for your space by connecting to a vertical surface.

The image above shows an outline of a fixed post as viewed from the top on the left. On the right, a side view.
Fixed Post Installation
Installing Fixed posts is easy.
- 1. First, you need to position it. Centre the post about 1.5” under the track, and check that the post is plumb.
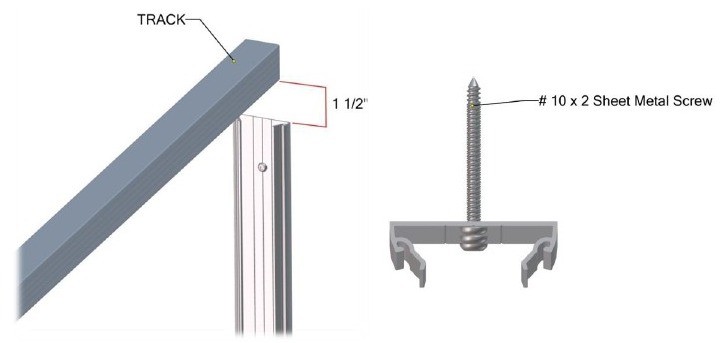 2. Once it’s in position, use the 2” screws provided to attach the post to the wall.
If your wall or other surface is made of anything other than wood or metal, you’ll need to ensure you have the appropriate fasteners.
Attaching the Curtain
Pull Straps
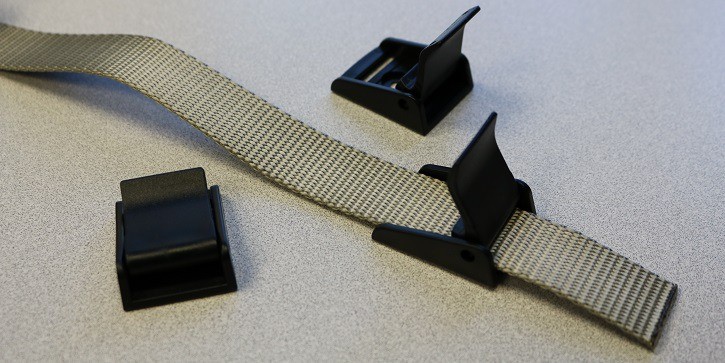
Pull straps allow door users to open and close the security grille smoothly, especially when the door is especially tall.
They come already installed in fixed posts for counter-height doors and taller-than-full-height doors. The strap fits in an adjustment buckle, somewhat like one on a ski boot.
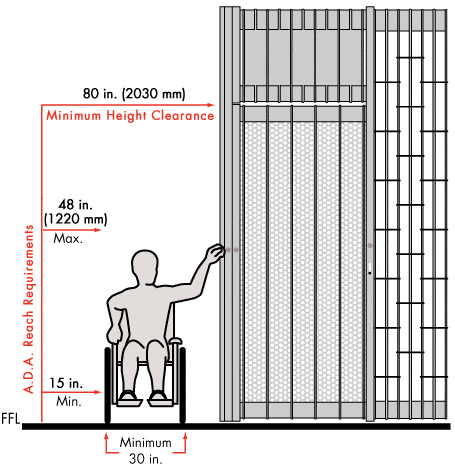
We provide 2 different lengths, depending on your needs (straps suited to wheelchair users are available). If at some point in the future you need a new or longer strap, we can provide one.
Pull Strap Adjustments
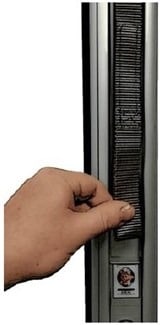 1. Determine the Right Strap Length
On full-height doors, the pull strap is typically attached about 1” above the lock. On tall counters, the strap is usually allowed to hang below the lock in order to be easily grasped.
To adjust the length, open the buckle so that the strap can be moved, and find the right length. You may need to get your customers involved in this step – the right height for you may not be the right height for the staff who will be using the door.
You’ll need to position the strap so that the part with the adhesive backing won’t cover the lock.
2. Trim the Excess Strap
Once you know you have the right length, use sturdy scissors to trim the extra so it doesn’t look untidy. Make your cut below the top of the buckle, so that no one sees the rough edge.
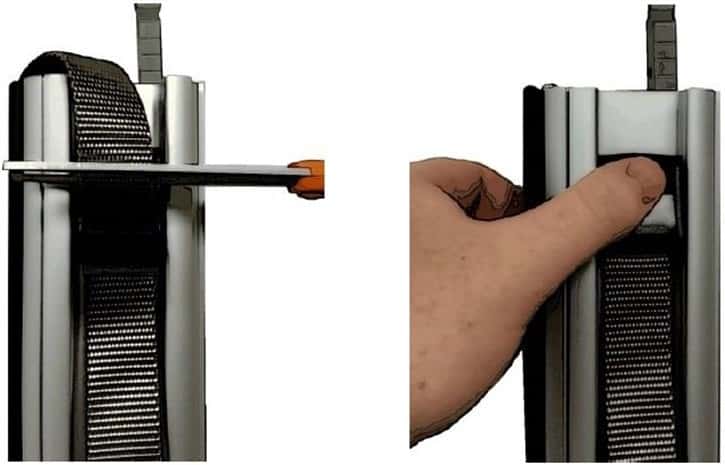
4. Close the Buckle
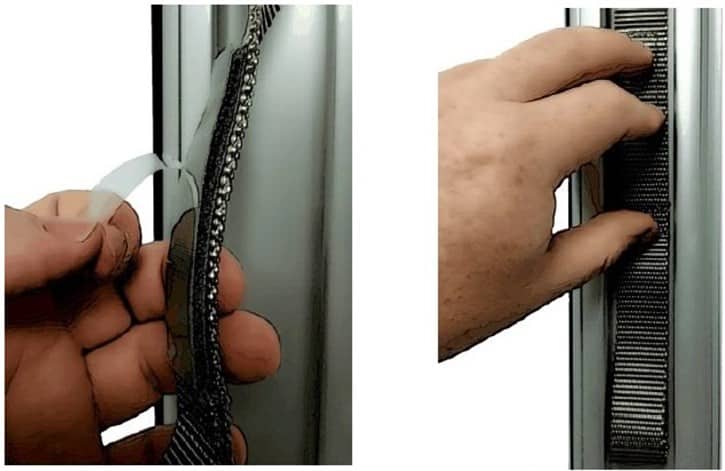
5. Peel and Stick
Remove the backing from the underside of the strap loop, pull the strap so it’s tight, and then press it firmly into the post.
11. Locking Plate Height Adjustments
Congratulations! Your side folding security grille is almost completely installed
All that remains is to do the fine adjustments to ensure your door operates as smoothly as possible. In this post, we’ll cover fine tuning locking mechanisms, and in the next post we’ll cover the posts and the curtain height adjustment.
While Dynamic Closures doors are built for easy installation and for forgiving measurement errors as much as possible, some installers may run into hiccups.
1. Adjusting the Height of the Lock Plate
Depending on how well the installation process goes, the lock plate on Wall Channel posts may end up higher or lower than it should be for smooth lock engagement.
As you may recall, Wall Channel posts are designed to receive a hook bolt to lock your door securely. If the lock plate isn’t at the right height, the hook bolt doesn’t fully catch behind the plate, and the door won’t be really locked.
Luckily it’s really easy to adjust the height of the plate.
- Unfasten and adjust. Using a Phillips #2 screwdriver, remove the two retaining screws in the lock plate and adjust the plate up or down as needed.
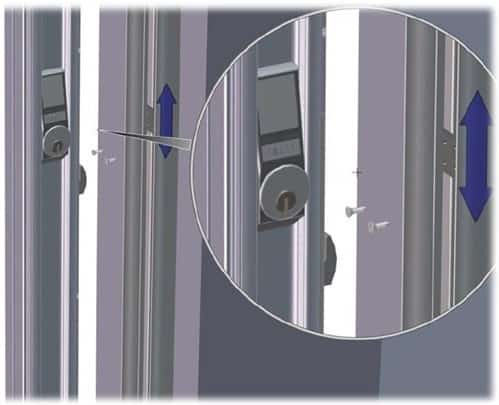
- Refasten the plate to the post. Two extra mounting holes are provided in case you need them to get proper “bite” into the aluminum.
- Test. Don’t forget to ensure the hook bolt catches fully.
It should not be necessary to drill additional holes in the plate.
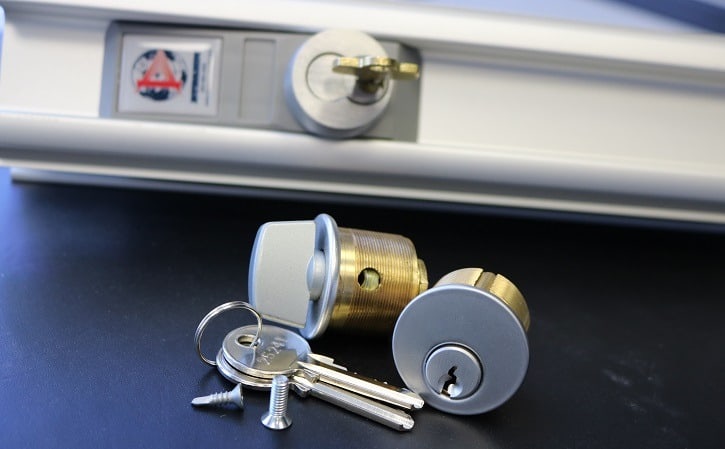
2. Changing the Cylinder
It’s easy to swap out the cylinder lock provided to one that works with your current key system. This is also useful so you can change locks to keep your facility secure even if there is employee turnover.
Your new lock will need to be a 1” mortise cylinder lock of your choice.
To remove the existing cylinder, follow these steps:
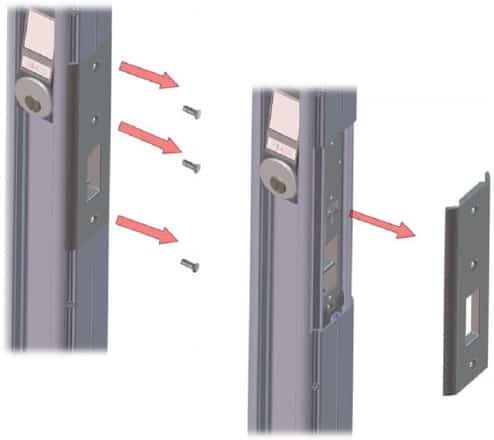
- On most post types, first remove the 3 retaining screws and the cover plate using a Phillips #2 screwdriver.
 For Intermediate and Top and Bottom posts, you first need to unlock the post so that the lock plates retract, and you can see the set screw through the oval cutout.
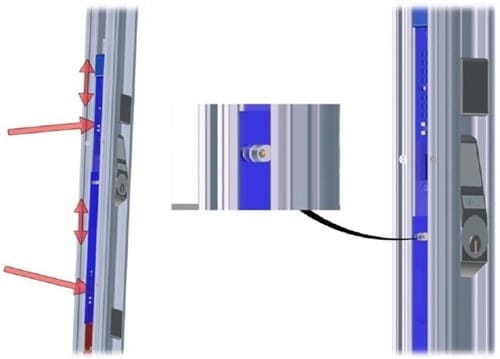 You may need to adjust the lock plates up or down to make the set screws accessible through the oval cutouts. You can find full instructions on how to do this in section 4, “Adjusting the Lock Rod Throw on Intermediate and Top and Bottom Posts”.
 - Loosen the set screw using a 5/64 Allen key.
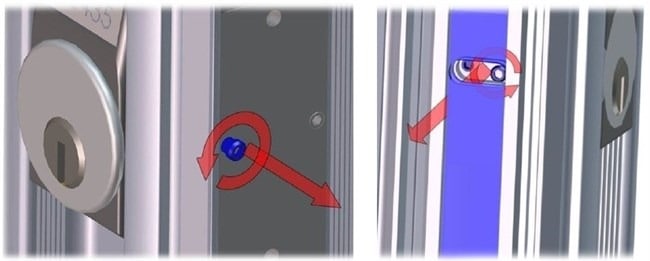
- Remove the lock cylinder by unscrewing in a counterclockwise direction. Tip: use a partially inserted key to make turning the cylinder easier.
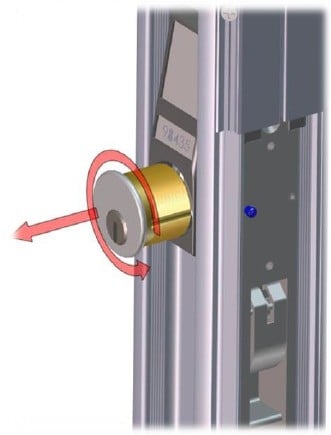
To install the new cylinder, just reverse the steps above.
3. Adjusting the Lock Rod Throw on Bipart Posts
The throw is a rod that goes down into the floor socket, securing the post to the ground. You can fine-tune the depth on this rod to ensure a better fit for maximum security.
- First you’ll need to remove the retaining screw for the lock cover plate using a #2 Phillips screwdriver.
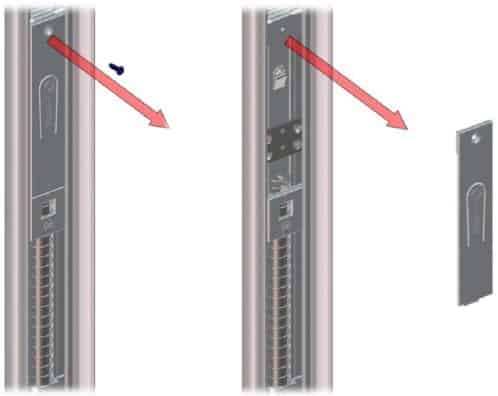
- Remove the two screws that hold the lock plate in place. Adjust the plate up if you need to shorten the throw of the bolt, and down to get more bolt into the floor socket.
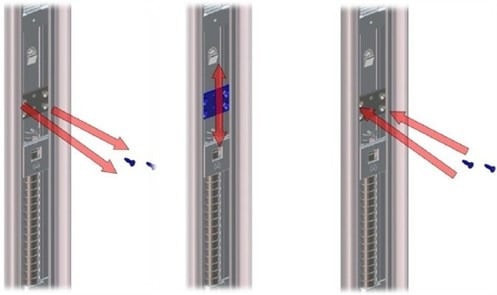
- Replace the lock plate retaining screws, and then the cover plate.
Test the throw to ensure it works smoothly and engages fully with the floor socket.
4. Adjusting the Lock Rod Throw on Intermediate and Top and Bottom Posts
With Intermediate and Top and Bottom posts, adjusting the throw is the same in principle, but access is slightly different.
- You can find the lock rod components on the side of the post that is closest to the hanger stem. You’ll need to remove the side of the post to get access.
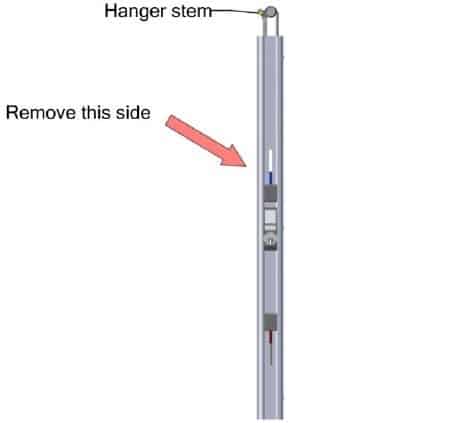
- Note:
With the top lock rod you’re adjusting the position (it always travels 1.5” from unlocked to locked), but with the bottom lock rod you’re adjusting the length of throw.
While they vary in how they work, the way you adjust them is the same. - Depress the spring loaded pins in the lock plate.
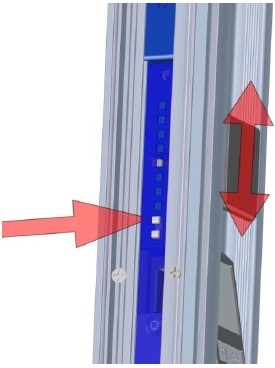
- Slide the plate up or down in ¼” intervals until the pins catch the lock plate at the right height.
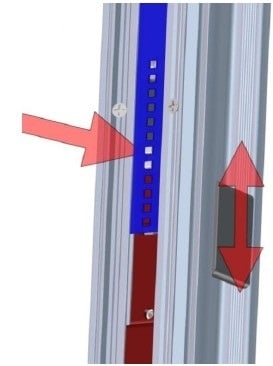
- Replace the side of the post.
As always, don’t forget to test.
12. Adjusting the Curtain Height
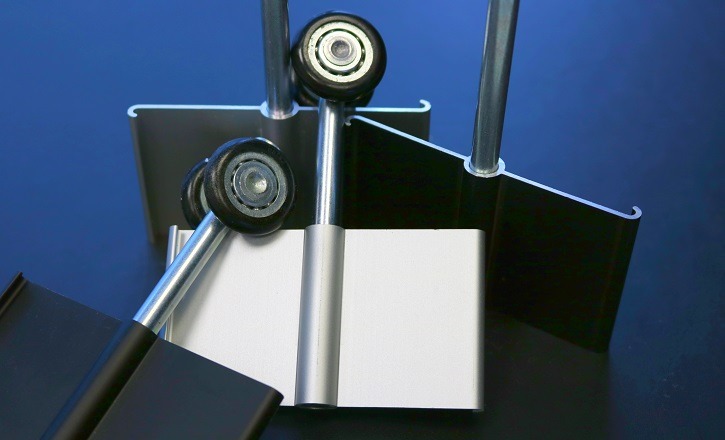
Dynamic Closures side folding security grilles are made to precise measurements and are easy to install for experienced contractors. But even the best-made spaces can have minor imperfections that don’t become noticeable until you start installing the door.
Changing the overall curtain height is done by adjusting the trolleys that connect the curtains to the overhead track.
Our adjustable curtain hangers help you deal with floors or counters that aren’t perfectly level , or even small errors in the measurements. This will help your door look perfectly tailored for the opening of the area you’re securing.
Not all of our customers ask for these adjustable trolleys. But if you want to be able to fine tune the size of the gap below the curtain, the extra 1” of adjustability means a lot to those who notice details like this.
How to Adjust the Curtain
Please note that you have to adjust all the trolleys to the same height or the curtain will not ride smoothly in the track. The maximum height adjustment you can make is 1” up or down.
Adjust the Trolleys
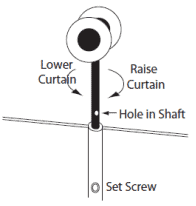 Adjusting each trolley is easy:
- Loosen the Set Screw on the Trolley
Using the 5/64 hex key provided with your delivery, loosen the set screw just enough that the trolley shaft is freed.
- Adjust the Shaft Height
Insert the hex key into the hole in the trolley shaft.
- Turn the hex key clockwise to raise the curtain.
- Turn the hex key counterclockwise to lower the curtain.
Count the number of turns. This will allow you to easily repeat the process.
- 8 complete rotations will make a ¼” inch change in height.
- 32 complete rotations will make a 1” change.
- Tighten the Set Screw
Ensure the set screw is snug to retain your settings.
- Repeat on All Trolleys
Once you know the number of turns to make on your first trolley to get the height you want, it’s easier to adjust the rest of them.
Adjust the Height of All Posts in the Curtain
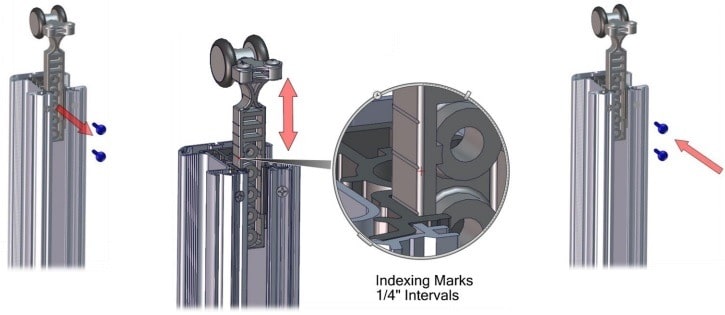
- Remove the Screws
Remove the two screws holding the hanger in place. Be sure to support the post so it doesn’t fall.
- Adjust
Using the ¼” index marks on the side of the hanger as a guide, adjust the post to the desired height.
- Replace the Screws
Replace the screws, selecting appropriate holes in the hanger so that both will be able to grab the back of the support.
Test the Curtain
Your curtain should ride smoothly in the track and not drag on the ground. If needed, readjust.
We test every curtain before it leaves the factory, and one of the things we check for is smooth operation. If your curtain is snagging, then something is wrong.
Our Expert Team is Ready to Help
This brings to a close our series on side folding security door installation. We hope you’ve found the additional information helpful.
One of the good things about working with Dynamic Closures is that we don’t just pull a door off the shelf and ship it to you. We provide expert help to you throughout the process of choosing and installing doors for commercial spaces.
Whether you’re an architect, commercial designer, dealer or installer, our expert Customer Support team is here to help. The team has many decades’ worth of experience and can help you save time and money through selection, specifications, delivery, and installation of your door.
Call them at 1-800-663-4599 during our support hours (Monday to Friday 8 AM-5 PM Eastern).
You can also send them an email through the form on our contact page.

